21 April 2015 21:17

Rise of the Triad started out as an add-on to Wolfenstein 3D. The first beta version was based on the Wolfenstein 3D engine and in the final version of Rise of the Triad (with it's own engine) you can clearly see the roots of the Wolfenstein 3D engine. You can read the original Rise of the Triad (ROTT) design here. If you look close you will see connections between Wolfenstein 3D and ROTT.
Download
Download Wolfenstein 3D Part II: Rise of the Triad (version 1.1) here.
To preserve originality I used the DOS-version of Wolfenstein 3D as base. Please use DOSBox in order to play this game on a modern PC.
In-game video
My goal is to create a Wolfenstein 3D mod with the beta version in mind, and this article guides through the process of creating it.
Summary
1. Creating the original2. The result and download
3. Development
3.1. Tools I used
3.2. Extracting the original images
3.3. Modifying Wolfenstein 3D
3.3.1. Animated walls/textures.
3.3.2. Directional 3D sprites
3.3.3. Floor/ceiling textures
3.3.4. Door changes
3.3.5. Modifying the HUD
3.3.6. Smoothing the starup
3.3.7. Main menu and episodes
3.3.8. Fade effects and border color
4. Final notes
5. Final rebuild
6. Version 1.1
6. Source code
1. Creating the original
I've searched on the web for projects to create the original Wolfenstein 3D Part 2, but didn't find any or just idea's that never spun off. Too bad, so I tried to start it on my own and to get Wolfenstein 3D running with the original graphics and such. I will use Wolfenstein 3D as base, rather than using the ROTT-source because the original game would've run on the Wolfenstein 3D engine as well.My goal for now:
1. Use some of the original textures and sprites along with it's features
2. Use an existing ROTT map as template together with some home-made maps
3. Modify intro screen and menu
4. Use the green HUD
5. Make a finished product with one episode
2. The Result and download
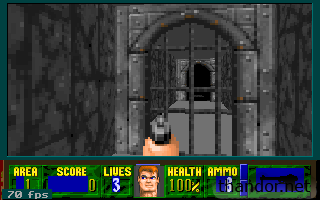
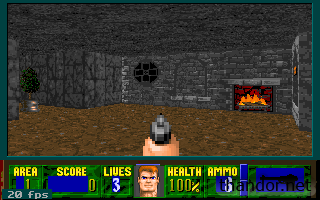
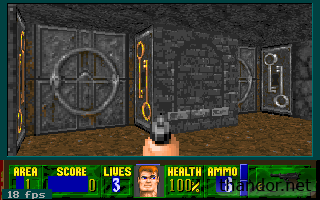
You can download the final version here! A few screenshots of how it looks like: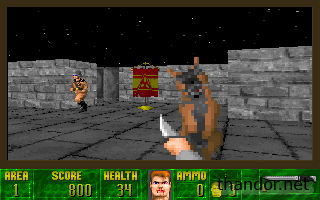
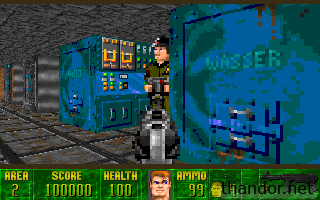
 Rise of the Triad Wolfenstein 3D: Part II screenshots.
3. Development
I documented a few steps in the process of creating this game. Not every bit is documented but this will give you a pretty good insight of what I've done to create the game.3.1 Tools I used
- ChaosEdit V1.27Great editor for Wolfenstein 3D.
- Game File Explorer v1.32
Used to extract original ROTT textures.
3.2. Extracting the original images
The original textures are 64px by 64px. Apogee supplied a lot of images but not everything. The enemies don't have a running/shooting texture. In order to create something as original as possible I will use the original textures and fill up gaps by using textures from the released version Rise of the Triad. Some of the models we're already done by other people. Thanks go out to RGamesINC, Majik Monkee, Justin, The Great Wasabi, Conner94 and my very own brother.I could not find the red officer model thus I decided to make it on my own. My brother was of great help here.
3.3. Modifying Wolfenstein 3D
The engine of Rise of the Triad is superior compared to Wolfenstein 3D in a few aspects. To overcome this I will change the Wolfenstein 3D source code. Thanks to the well known 'people of the Internet' for the tutorials! Note: I wrote this when I started developing with the original Wolfenstein 3D source, whereas the final version has been rewritten (again) from scratch using Chris' Memboost.zip. Source may vary!3.3.1. Animated walls/textures.
Used for the fireplace texture. The tutorial gives you the code for animating three textures. It includes five pieces of code; each part is like this and represents a certain speed:I changed the '%3' to '%4' in order to use four textures. Finally the editor (ChaosEdit) has to be modified to use the animation effect. Go to the folder 'mapobjects\Wolfenstein 3D' inside the installation folder of ChaosEdit and find Lists.txt. Add extra lines here; I added the following near line 67:case ANIMTILE:
tilehit+=(frameon>>6)%3;
break;
You can also add number 103 and 104 which are even more speedier but I didn't need them for now.98,"Secret door",
100,"Animation slow",
101,"Animation normal",
102,"Animation fast",
43,"Gold key",
At last but not least you have to place a wall and load up the textures. I used 'Grey wall 1' and texture 70, 72, 74 and 76. Don't forget to insert the object 'animation fast' right over the wall.
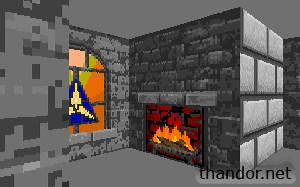
After implementing this the fireplace started working!
3.3.2. Directional 3D sprites
In order to use transparent walls I've implemented the directional sprites which I based on the Chaos Software's 3D directional sprites tutorial. Unfortunately the link to his website doesn't exist anymore.Because the directional sprites eat up some memory I had to remove wolfhack.c and whack_a.asm from the project. In Borland C go to Window > Project and remove both files.
After following the tutorial I've changed ChaosEdit to use the sprite. In Lists.txt I've added number 72:
In sprinfo.txt I've added number 72 as well:32,"Skeleton",
72,"Fence door",
42,"Bones 1",
By using sprite number 49 I did overwrite the vines sprite but I wasn't planning on using that texture anyway.70 49 1 0
72 49 1 0
124 95 1 0
Current ingame progress including a see-throught 'wall' (Directional 3D sprite)!
3.3.3. Floor/ceiling textures
A great improvement but bad for performance!I used this tutorial to get floor and ceiling. I doubt if the original idea of Wolfenstein 3D Part II : Rise of the Triad also included the floor/ceiling textures, but I decided to implement them for better looks.

After implementing floor/sky textures.
Because the floor/sky textures use up roughly double the number of cycles I added an option to switch off the floor/sky textures on-the-fly. In-game go to the Menu > Options and toggle the 'High Detail Enabled' setting.
3.3.4. Door changes
Changing the door textures is an easy task. Changing the 'doortracks' requires modification in the source code. I dove into WL_DRAW.C and found references like DOORWALL. In order to add the ROTT doortracks with the silver and golden key I modified the following:Changed '#define DOORWALL (PMSpriteStart-8)' to value -10. I did this because I added two extra textures.
Then I've searched for HitVertWall and changed 'unsigned texture;' to 'unsigned texture, doornum;'. Scroll down and search for '// check for adjacent doors' and the following code:
Also repeat this for HitHorizWall but change all the y-axis to x-axis (ytile will be xtile etcetera). For HitHorizWall you'll change:if (tilehit & 0x40)
{ // check for adjacent doors
ytile = yintercept>>TILESHIFT;
if ( tilemap[xtile-xtilestep][ytile]&0x80)
{
//Door found
doornum = tilemap[xtile-xtilestep][ytile]&0x7f;
switch (doorobjlist[doornum].lock)
{
case dr_normal:
wallpic = DOORWALL+2;
break;
case dr_lock1:
wallpic = DOORWALL+9;
break;
case dr_lock2:
wallpic = DOORWALL+8;
break;
case dr_lock3:
case dr_lock4:
case dr_elevator:
wallpic = DOORWALL+2;
break;
}
}
else
{
wallpic = vertwall[tilehit & ~0x40];
}
}
toif (tilehit & 0x40)
{ // check for adjacent doors
xtile = xintercept>>TILESHIFT;
if ( tilemap[xtile][ytile-ytilestep]&0x80 )
wallpic = DOORWALL+2;
else
wallpic = horizwall[tilehit & ~0x40];
}
if (tilehit & 0x40)
{ // check for adjacent doors
xtile = xintercept>>TILESHIFT;
if ( tilemap[xtile][ytile-ytilestep]&0x80 )
{
//Door found
doornum = tilemap[xtile][ytile-ytilestep]&0x7f;
switch (doorobjlist[doornum].lock)
{
case dr_normal:
wallpic = DOORWALL+2;
break;
case dr_lock1:
wallpic = DOORWALL+9;
break;
case dr_lock2:
wallpic = DOORWALL+8;
break;
case dr_lock3:
case dr_lock4:
case dr_elevator:
wallpic = DOORWALL+2;
break;
}
}
else
{
wallpic = horizwall[tilehit & ~0x40];
}
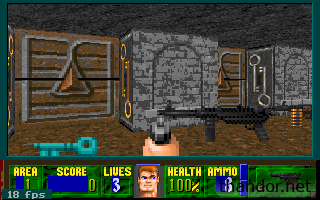
Including nice side textures ('doortracks') with corresponding key colors.
3.3.5. Modifying the HUD
The original Rise of the Triad files have two different HUD's. I will use the thin HUD (see image) because I guess this one is 'newer'. The thick HUD seems more like the original Wolf3D HUD with different colors.
Because the HUD is smaller I have to change the source to draw a smaller HUD and to place all the items on the correct spot.
In WL_DEF.H I've changed #define STATUSLINES 40 into 30. This draws a smaller HUD.
In WL_AGENT.C:
- Change LatchDrawPic (x,y,picnum); into LatchDrawPic (x+1,y-5,picnum); in order to change the B.J. head.
- Change LatchNumber (21,16,3,gamestate.health); into LatchNumber (14,20,2,gamestate.health);
- Change LatchNumber (27,16,2,gamestate.ammo); into LatchNumber (22,20,3,gamestate.ammo);
- Change LatchNumber (6,16,6,gamestate.score); into LatchNumber (5,20,6,gamestate.score);
- Commented (//) the DrawLives
- Changed LatchNumber (2,16,2,gamestate.mapon+1); into LatchNumber (0,20,2,gamestate.mapon+1);
- Changed StatusDrawPic (32,8,KNIFEPIC+gamestate.weapon); into StatusDrawPic (32,5,KNIFEPIC+gamestate.weapon);
- Changed the keys according this tutorial: Poet's Source Code Tutorials and created the proper key images.
Perhaps I haven't mentioned all the changes I did here. In case you struggle to get the HUD in proper shape please read the source code thoroughly and follow up any leads to the HUD one by one.
3.3.6. Smoothing the starup
I disabled the PG13 screen by commenting the void PG13 section in WL_INTER.C. I did not comment one VW_FadeOut(); line because I wanted to keep the fadeout effect. In order to re-design the signon screen I followed this tutorial.3.3.7. Main menu and episodes
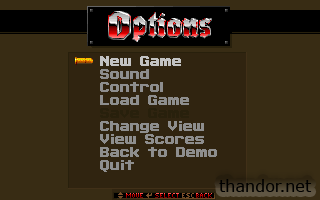
To re-shape the 'Skill selection' menu I've modified WL_MENU.C: changed the values of 'void DrawNewGameDiff(int w)' and 'void DrawNewGame(void)'.The color of the main menu is defined in WL_MENU.H. I changed the colors as following:
This is a solid brown color that matches the intro screen after importing it into Wolf3D. The original colors of Rise of the Triad are a tad different but because I did not fiddle with the palette some colors are different in my version.#define BORDCOLOR 0xDE
#define BORD2COLOR 0xDD
#define DEACTIVE 0xDF
#define BKGDCOLOR 0xE5
#define STRIPE 0xDF
#define MenuFadeOut() VL_FadeOut(0,255,0,0,0,10)
I used the original Wolf3D VGAGraph menu headers because the original introscreen also features the Wolf3D style font.
In WL_MENU.C I changed int EpisodeSelect[6]={1}; to int EpisodeSelect[4]={1}; and changed
intofor (i=0;i<4;i++)
VWB_DrawPic(NE_X+32,NE_Y+i*26,C_EPISODE1PIC+i);
I removed thefor
(i=0;i<4;i++)
VWB_DrawPic(NE_X+32,NE_Y+i*26,C_EPISODE1PIC+i);
following (don't forget the comma of Episode 4!):
I removed{0,"",0},
{3,"Episode 5\n"
"Trail of the Madman",0},
{0,"",0},
{3,"Episode 6\n"
"Confrontation",0}
and changedNewEmenu[8].active =
NewEmenu[10].active =
intoEpisodeSelect[1] =
EpisodeSelect[2] =
EpisodeSelect[3] =
EpisodeSelect[4] =
EpisodeSelect[5] = 1;
In order to disable the last three episodes I commented the NewEmnu[1].active = and EpisodeSelect[1] parts in the 'if (!findfirst("*.WL6",&f,FA_ARCH))' section.EpisodeSelect[1] =
EpisodeSelect[2] =
EpisodeSelect[3] = 1;
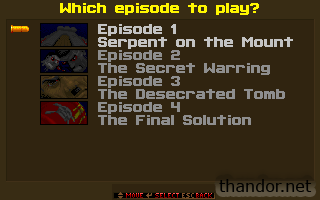
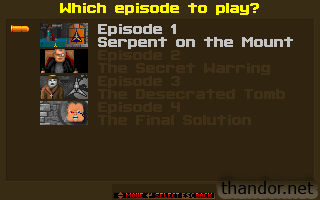
The brown main menu with just four episodes visible. In the final version it's only possible to select the first episode.
3.3.8. Fade effects, border color and victory-screens
The original Wolfenstein has an metal-like color as border, fade effects and in the screens between levels. This doesn't fit with the brown color of the menu.- In WL_ACT2.C in the A_StartDeathCam section I changed 'VW_Bar (0,0,320,200-STATUSLINES,127);' to VWB_Bar (0,0,320,200-STATUSLINES,222);
- In WL_GAME.C change all the VWB_Bar (0,0,xl-1,200-STATUSLINES,127); into VWB_Bar (0,0,xl-1,200-STATUSLINES,222); and the VWB_Vlin (yl-1,yl+viewheight,xl+viewwidth,125); into VWB_Vlin (yl-1,yl+viewheight,xl+viewwidth,220);
- In WL_INTER.C change VWB_Bar (0,0,320,200-STATUSLINES,127); into VWB_Bar (0,0,320,200-STATUSLINES,221);
- In WL_MENU.H change #define VIEWCOLOR 0x7d in #define VIEWCOLOR 222.
At last but not least I changed all the VGAGraph's and painted new brown images.
4. Final notes
I enjoyed creating this version of Wolfenstein 3D. The first bits of modification are fairly easy. It doesn't need much to see that the game is modified (different maps, textures and sounds). Lot's of source code is available and well documented. After the base of the game is ready the bug-hunting, level design and last bits have to be done, and those last bits are worst! Random crashes are difficult to locate, adding functionality that is not documented can be time consuming and after a few levels it's getting harder to find inspiration for the next level. Nevertheless I'm satisfied with the result.
5. Final rebuild
Because I was struggling with bugs I decided to rebuild everything from scratch. I copied a fresh version of Wolfenstein 3D, used the optimized Wolf3D source ('memboost.zip') as base and added the new content step by step. Each subversion had a new feature (ROTT01; textures, ROTT02; sprites; ROTT06; Moving walls) so in case I run into bugs I know which modification is to blame.
In the rebuild process I noticed the following:
The moving walls code doesn't work with memboost. In order to get it working again you have to change
toswitch(*(mapsegs[1]+farmapylookup[ytile]+xtile))
switch(*(mapsegs[1]+ytile*MAPSTRETCH + xtile))
A few other tutorials will be more difficult for the unexperienced coder if you use the 'memboost' source code, because few parts of the code are quite different.
6. Version 1.1
Updated 11 September 2019: I made an improvement in the source-code by keeping the old scalers. This will use up extra memory but also increase performance by about 40% according to the readme of Chris' memboost.zip.
The readme dictates that #define OLDSCALE in the VERSION.H should be uncommented. However, due several changes in the source-code this didn't work as intended anymore. In WL_DRAW.C I bumped into problems with the _Scale3DShape function because in WL_SCALE.C the Scale3DShape code was placed in the 'non OLDSCALE' section (defined by #ifndef OLDSCALE). I copied the code to the last block (row #1366) to also include it when OLDSCALE is uncommented.
7. Source code
Download the source code of Wolfenstein 3D Part II: Rise of the Triad (version 1.1): WROTT11SOURCE.ZIP.


 Share on WhatsApp
 Share on Twitter