12 December 2007 21:33

 thandor.net nor the author is responsible for any damage. Use at your own risk!
20 years ago it was cool to overclock an 8MHz XT up to 10MHz using a soldering iron to swap an oscillator crystal. Today it's a simple as using your arrow keys or mouse to change some numbers and get a few 100MHz extra. Is it? It is, as long as you know what you are doing. This howto will help you understand the basics of overclocking your processor.
Summary
1. Precautions
1.1 In case it fails
2. Check your cooling
2.1. Which temperatures are normal?
3. FSB
3.1. Multiplier
3.2. PCI-lock
4. Voltages
5. Testing for stability
6. Final words
1. Precautions
First of all: Never panic when something unexpected happens!
Components in your PC are designed to run at certain clock frequencies. If you set them higher then they we're designed for, they might produce errors which will result in a crash. The definition of crash is a machine that miscalculates because it runs beyond it's abilities and won't respond anymore. After resetting the settings it will run fine again. Some crashes might cause data-corruption so it's advisable to backup your most important files. Especially with RAID setups. RAID0 setups are more sensitive to data corruption and a reset of the BIOS might wipe out the RAID-array settings.
1. In case it fails
A known scenario in the overclocking scene is a black screen after the first boot when new settings are applied. In 99,999% of the cases this means your new settings aren't suitable for your system. To get the system running again you'll have to reset the settings to original. Consult your motherboard manual for instructions. In most cases it's as simple as follows: Unplug the power cord. Try powering on the system (but it won't of course). Switch the jumper on the BIOS reset pins (in most cases JP1). Try powering on again. Put the jumper back on it's original place. Insert the power cord and boot up again.
2. Check your cooling
The energy that goes in a PC will leave the PC as heat. Adequate cooling is necessary to maintain proper functions, especially when overclocking, since overclocked chips absorb more energy (and thus produce more heat) and might be more sensitive to high temperatures.
To check your cooling you can pay a visit to the BIOS. Usually it's accessible by pressing DEL, F1, F10 or F12 during the P.O.S.T. (Power On Self Test, where the RAM is being checked during startup). In most cases you can find something like 'PC Health Status' or 'Hardware Information'. One notice on checking the temperatures in the BIOS: You can't check while actually 'using' (stressing / testing) the PC. It's better to pick a software monitoring tool and use a CPU stress-test at the same time.
Start Microsoft Windows and download Speedfan, a monitoring tool. The next tool to download is Orthos, a stress-testing tool for your processor and RAM. After downloading and installing you monitor the temperatures using Speedfan. Then start Orthos and click 'Start' with the 'Small FFTs - stress CPU' test selected. Continue monitoring Speedfan and watch the temperature rising. Let your machine run for about 10 minutes.
2.1. Which temperatures are normal?
This depends on your CPU. Intel Core 2 Duo and Intel Pentium D CPU's are designed to operate at 60C to 65C. An AMD Athlon64 (or alikes) would still be fine around 65C to 70C. If you want to know the exact values check out AMD compare or Intels ARK.
In most cases it's better to keep the temperature under 55C. Although if it reaches 57C in overclocked state it's no problem either. If your temperature is 57C without overclocking you might consider improving your cooling before overclocking. Un-dust fan's, use good Thermal Interface Material (TIM) between your CPU and the heatsink, use a decent CPU cooler and don't forget to create airflow by installing case-fans.
3. FSB
Something really important in the overclocking scene. A PC has clock-frequencies which are based upon a system-clock. The system-clock is also referred as the FSB (Front Side Bus, for todays Intel systems) or HyperTransport (for todays AMD systems). Modern PC's use a 200MHz, 266MHz or 333MHz system-clock.
 | Question: Only 200MHz? That's slow! Mine has 800MHz! |
| No, you don't have 800MHz. It's more likely you're using an Intel Pentium 4/D, low-end Core 2 or AMD Athlon64 on S754. Today's FSB's are quadrupled which means that they transfer more data per clock-tick. The HyperTransport connection used for AMD Athlon64 systems are multiplied, 4x (4x200 = 800MT/s) for S754, 5x for S939 and AM2. 200MHz = QDR800 or 800MHz or 1000MT/s 266MHz = QDR1066 or 1066MHz |
The FSB (or HyperTransport Link, from now on I refer to FSB) allows data to travel inside your PC. It's a connection between the CPU and the northbridge, between the graphics card and your processor. Raising the clock-frequency (and thus speed) of this FSB will increase throughput inside your system. But, it also increases the speed of other components inside a PC. Remember the system-clock (which we raise along with the FSB; automatically) was responsible for the clock-frequencies inside a PC?
3.1. Multiplier
The clock-frequency of the processor is being calculated by the FSB and the multiplier. The FSB has a certain frequency, let's take 200MHz for example. Using a processor with a multiplier of 15x will result in 3000MHz (15x200). Increasing the multiplier by one will increase the clock-frequency of the processor to 3200MHz and leave the rest of the clock-frequencies inside the PC intact. Decreasing the multiplier by one will result in 2800MHz.
| Question: Decreasing the multiplier? It'll be slower! |
| Decreasing the multiplier might sound ridiculous because the CPU get's slower. What if we raise the FSB to 214MHz and set the multiplier on 14x? That would result in 3000MHz. The same clock-frequency but a faster FSB which will make the whole PC faster. |
Not all CPU's allow multiplier modification. Todays CPU's often allow a lower multiplier, but not a higher multiplier. This is due to energy saving techniques like Cool 'n Quiet and Speedstep. Some more expensive CPU's like 'Black Editions' or 'Extreme Editions' might have a fully unlocked multiplier and thus allow to select a higher multiplier. Other examples of such CPU's are some (early) engineering samples.
3.2. PCI-lock
Like said before, the clock-frequencies are based upon the system-clock (FSB). Same goes for the southbridge which handles the PCI-bus. The PCI-bus works at 33MHz and it's best to keep it that way. How does the PCI bus gets it's clock-frequency? By a divider, the opposite of a multiplier. In case of a 200MHz FSB we would need a 1/6 divider since 33MHz is one-sixth of 200MHz. Increasing the 200MHz FSB to 214MHz will increase the PCI bus with 2,66MHz because 214 / 6 is 35,6MHz.
Modern / popular boards are equipped with a PCI-lock. This means the PCI bus will remain at 33MHz, no matter what the FSB runs at. With older and/or cheaper boards it can be less colorful. A PCI bus at 35,6MHz is no problem, 37,5MHz is considered a safe top. Devices like harddisk controllers (on-board S-ATA for example) are connected with the PCI-bus and those controllers usually don't like very high clock-frequencies. In most cases this will only result in a FSB clock-frequency of 224MHz as the PCI-bus will run at 37,5MHz. 224x15 means 3360MHz which is only 360MHz more then original.
| Question: How can I lock my PCI-bus? |
| If you can't find a setting regarding PCI-locks it's likely you can't force a lock. |
| Question: My board supports CPU's with an FSB of 266MHz, why can I only use 224MHz on my 200MHz FSB CPU? |
| Your board probably lacks a PCI lock and the configuration on the CPU tells your motherboard to use a 200MHz FSB. This is called a 'bootstrap'. In some cases it's possible to force your board to run at 266MHz (and setting the PCI lock to settings appropriate with the 266MHz FSB), in other cases it would be possible to modify your CPU so it acts like an 266MHz-FSB CPU. The latter would require physical modifications which will not be discussed in this howto. |
4. Voltages
Voltages come in to play when a CPU won't scale up anymore. Adding some extra juice will help the transistors switch better. Too much juice might have negative effects so be careful with the voltage settings.
What is considered a good maximum? It depends on the architecture, manufacturing process and overclocking capability of your processor. CPU's manufactured at 180nm technology can handle much higher voltages then CPU's made on 65nm. For example: An AMD Athlon 'Thunderbird' (180nm) will run with 2V at ease, an Intel Pentium 4 (130nm) might end up dead after a week with 1,85V.
Defining the 'maximum voltage' in your case is quite easy. Overclock the system until it looses it's stability. Then raise the vCore one step (steps might differ, take the smallest step possible) and test again. No effect? Raise another step. If you notice better stability it's most likely your CPU needs a bit more voltage to maintain proper function. Still no effect? Look for other causes (I.e. PCI lock, cooling) before you raise another step.
After raising the voltage a few steps it's most likely the CPU will run better. This allow you to overclock a bit higher until you loose stability again. To regain stability it's necessary to raise a few steps again. When going through this process you'll probably notice some relations between the clock-frequency and the vCore. I'll illustrate:
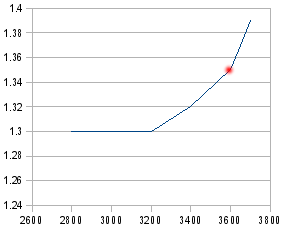
The illustration shows an easy overclock from 2800MHz to 3200MHz as 3200MHz still works with the stock voltage (1.3V). Raising to 3400MHz needed a little bit more voltage (1.32V). Raising to 3600MHz needed an extra 0,3V. Raising another 50MHz already needed a raise to 1,37V. It's easy to see that the last few MHz needs a lot more voltage. I call the point between raising MHz easily along with a bit extra voltage 'the ideal overclock'. Overclocking beyond that point (which is, in this case, more then 3600MHz (see the red dot)) will increase the speed only a fraction but will need a lot more power, it's not rocket science to find out the CPU just can't handle much more.
5. Testing for stability
In chapter 2 ('Check your Cooling') I already mentioned two programs. Always monitor the temperature for a while with Speedfan during stresstesting. A summary of useful programs can found below. When testing real stability don't rely on just one program but use them all. Every program will test on it's own way and thus test other parts of your system.
1. Orthos
Used to stress both CPU and memory (RAM). If you can run this application for about 24 hours you can be pretty sure your CPU is running stable.
Download here
2. 3DMark
3DMark is an application to benchmark your system using a 3D graphics demo. Run this benchmark a few times.
Download here
3. Hexus PiFast! / PiFast
PiFast will calculate Pi and stress your CPU while relying on RAM. This way RAM will be tested a bit, too.
Download here or hexus_pifast.zip.
4. SuperPi
SuperPi works like Hexus PiFast!. Please set the benchmark to 1M since most benchmarks are performed at that setting.
Download here
5. Memtest86+
Memtest86+ is an application mainly written for testing RAM (hence the name Memtest). Be sure to run this application for a long time (and finishing all the test will take very long!).
Instructions on how to use:
Download here
6. Final words
Overclocking needs patience. Tune up the clockfrequencies using little steps and don't touch the voltages unless it's neccesary to touch them. Always stresstest for a short while after applying new settings and constantly monitor the temperatures inside your system.
 Share on WhatsApp
 Share on Twitter